Create Routes
From FloristWiki
|
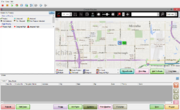
The Create Routes window enables you to create and optimize delivery routes. The window itself is organized into several sections, each one playing a pivotal role in ensuring the orders you are delivering are handled in the most efficient manner possible, and ultimately enabling you to get the orders into the hands of the recipients.
The areas of the window that are displayed when you open the Create Routes window can be configured from the Delivery Snapshot Window under the Tools menu.
Orders for Zone(s)
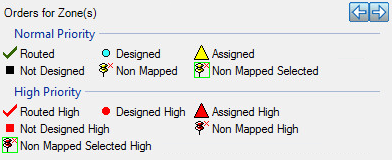
Orders for the zones selected in the Delivery Snapshot window are displayed in the Orders for Zone(s) list. Critical information about the order, including the ticket number, priority, special instructions, recipient(s), recipient’s phone number, and address are displayed in the list as well if you click on the order and expand it. An icon indicates the order status, with a legend above the order list explaining the meanings of the various icons displayed next to each order.
|
High priority items appear in green. |
| Status | Description |
| Routed | Orders that have been routed. |
| Designed | Orders that have been designed (but not routed). |
| Assigned | Orders that have been assigned but not marked as designed. |
| Not Designed | Orders that have not been designed. |
| Not Mapped | Orders that have been designed but not mapped. |
| Not Mapped Selected | The selected non-mapped order. |
| Routed High | High-priority orders that have been routed. |
| Designed High | High-priority orders that have been designed (but not routed). |
| Assigned High | High-priority orders that have been assigned but not marked as designed. |
| Not Designed High | High-priority orders that have not been designed. |
| Non Mapped High | High-priority orders that have been designed but not mapped. |
| Non Mapped Selected High | The selected non-mapped high priority order. |
When you right-click on an order and select View Order Detail, the Order Details popup window appears. This popup contains information about the order. See Order Details Window for additional information on this popup window. You can show and hide the Orders list from the [[Create Routes window by clicking on the left and right arrow buttons at the top of the window. You can also right-click on an order and select Change Zone to change a delivery zone for an order.
Map
The map displays the position of your shop and the orders from the delivery zones. You can use the polygon tool to select a group of orders and add them to a route.
Map Icons
| Status | Description |
| Default | The default icon for a location on the map. |
| Multiple | Multiple orders in a single location. |
| Assigned | Orders that have been assigned but not marked as designed. |
| Routed | Orders that have been routed. |
| Truck Position | The location of the truck. |
| Delivered | Orders that have been delivered. |
| Assigned High | High-priority orders that have been assigned but not marked as designed. |
| Routed High | High-priority orders that have been routed. |
| Origin | The route origin. |
| Designed | Orders that have been designed (but not routed). |
| Not Designed | Orders that have not been designed. |
| On Truck | Orders are on truck to be delivered. |
| Designed High | High-priority orders that have been designed (but not routed). |
| Not Design High | High-priority orders that have not been designed. |
When you click Show Details, each icon (representing an order) on the map displays information about the order:
- Order and ticket number
- Address
- Zone
- Recipient
- Recipient phone number
- Priority
- Design status
- Route status
- Delivery status
You can show and hide the map by clicking the arrow buttons at the top of the window.
Top Button Ribbon
The button ribbon at the bottom of the map provides you access to several functions related to route creation.
| Button | Description |
| Show Details | This button only appears when you are not displaying details for orders on the map. It shows details, including order number, address, zone, recipient, and design status. |
| Hide Details | This button only appears when you are displaying details for orders on the map. It hides the details. |
| Print Map | Prints the map. |
| Add To Route | Click this button to add the currently selected orders on the map to the route. |
| Link Order | Click this button to link the selected pushpin to the unmapped order that is currently highlighted in the Orders list. |
| Unlink Order | Click this button to unlink an order that you had previously linked. |
Directions
The Directions list appears at the top of the window directly above the map. Once you add stops to the route, directions are created based on your stops. These directions can change if you add an origin (and final stop) to the route, as well as if you optimize the route based on quickest path or shortest distance. They can also change if you modify the stop list (either by manually reordering it or by adding additional, non-order-related stops).
Route Stops List
The route stops list contains all of the stops for the current delivery route in the current order for the route. (The only exception is if you have set an origin point, it will be stops 1 and the last stop, even though it is not listed in the route stops list.) You can have more than one route in the Create Routes window; the list contains different tabs representing each route.
This list contains the following columns:
| Column | Description |
| Stop No | The stop number for the route. When you have set the origin for the route, it will be set as both the first and last stop number in the route by default. |
| Invoice No | The invoice number for the stop. |
| Recipient Name | The recipient’s name. |
| Address | The recipient’s address. |
| City | The recipient’s city. |
| State | The recipient’s state or province. |
| Zip | The recipient’s ZIP or postal code. |
| Zone | The recipient’s delivery zone. |
| Priority | The priorty of the most important item in the stop (as designated by the Delivery Priority Code). |
| Store | The store where the order originated. |
Next to the routes list, there are buttons enabling you to move the selected stop up or down in the route list. You can also click and drag within the list to reorder it. If you click the Delete button, the selected stop is removed from the route.
You can show and hide the orders list by clicking the show and hide buttons at the top right of the area.
Bottom Button Ribbon
At the bottom of the Create Route Routes window, there are several buttons in the button ribbon that provide you with further functionality.
| Button | Description |
| Refresh | Refreshes the window with the most up-to-date information. |
| Add Zone | Opens the Add Zone window, enabling you to add orders from additional zones to your route. |
| Origin | Opens the Route Origin window, enabling you to specify the route origin. If you select an origin, the first and last stop in the route will automatically be the specified origin. |
| Add Order | Opens the Add Order window, allowing you to add orders to the delivery route that do not already display in the Orders for Zone(s) list. |
| Optimize | Opens the Optimize Route Options window, from which you can select to optimize by quickest path or shortest path. |
| Print Manifest | Prints the route manifest (routing slip). |
| Complete | Opens the Complete Route, enabling you to complete the delivery route. |
| Save | Saves your changes. You should click this button prior to clicking Escape to close the window if you want to keep your changes. |
| Escape | Closes the Create Routes window without saving your changes. |
For more information on routes, see the following:
- Complete Route
- Working with Delivery Routes
- Optimize Route Options
- Rename Route
- Route Origin
- Editing Saved (Incomplete) Routes
- Mapping and Routing Using Mercury Delivery
- Viewing the Route Details
- Routing Progress Window
- Completing Delivery Routes in Mercury Delivery for IVR
- Optimizing Routes
- Saved Routes Window


