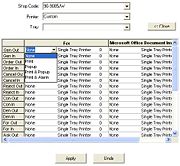
Mercury Administration: Printer Routing Screen
From FloristWiki
The Printer Routing screen allows you to specify for each incoming and outgoing message type the number of copies you want printed when a message is sent or received. You can also specify the printer and printer tray to use when printing.
For each message type, you can also select further behavior:
| Setting | Description |
| The message prints to the designated printed. | |
| Popup | You receive a message confirming the message has been sent or received. For example: The General message has been sent. |
| Print and Popup | The message both prints to your printer and you receive a confirmation message. |
| Print and Alarm | The message prints to your printer and a short beep sounds. |
Accessing the Printer Routing Screen
To access the Printer Routing screen in Mercury Administration:
- Launch Mercury Administration.
- Double-click Mercury Administration in the explorer pane.
- Double-click the Wire Service folder.
- Double-click Printer Routing. The Printer Routing screen opens.
Changing Printer Routing Options
To change printer routing options:
- Access the Printer Routing Options screen in Mercury Administration.
- By default, your shop code appears in the Shop Code field. click the arrow and choose the shop code for which you want to set printer routing from the list.
- To change the default Mercury Message printer, click the arrow in the Printer list and choose your default printer. All messages print to this printer (unless otherwise specified).
- To change the default printer tray, click the arrow in the Default Tray list and choose a default tray for your printer.
- Click Advanced if you want to change the method of printer routing or the number of copies that you want to print for each message type.
- Initially, one copy of each incoming and outgoing message type prints to your default printer and tray. To change these settings, follow the procedures below:
- Click to the right of the word Print to reveal an arrow, and choose from the list whether you want that particular message to print, pop up on your screen, print & popup, print & alarm, or none of these.
- To change the tray to which this message will print, click to the right of the default tray name to reveal an arrow and then click the desired tray name.
- Click to the right of the number to change the number of copies. When the up and down arrows appear, select the number of copies you wish to print at each printer.
- When finished, click Close.
- Click Apply to save the information before exiting this screen.

