Working with Enclosure Cards
From FloristWiki
(Difference between revisions)
m |
m |
||
| (One intermediate revision not shown.) | |||
| Line 2: | Line 2: | ||
You can specify the message that is included with an order’s enclosure card. There are several options for the enclosure card, including whether a logo or banner is printed along with a message. | You can specify the message that is included with an order’s enclosure card. There are several options for the enclosure card, including whether a logo or banner is printed along with a message. | ||
| - | All settings for the enclosure card are configured via the Enclosure Card tab from the Mercury Direct Plus control panel. | + | All settings for the enclosure card are configured via the Enclosure Card tab from the [[Mercury Direct Plus Control Panel|Mercury Direct Plus control panel]]. |
'''To configure enclosure cards:''' | '''To configure enclosure cards:''' | ||
| - | #From the Mercury Direct Plus control panel, click the Edit menu. | + | #From the [[Mercury Direct Plus Control Panel|Mercury Direct Plus control panel]], click the Edit menu. |
#Click Options. | #Click Options. | ||
#Click the Enclosure Card tab. | #Click the Enclosure Card tab. | ||
| Line 22: | Line 22: | ||
<br> | <br> | ||
'''To modify and print an enclosure card:''' | '''To modify and print an enclosure card:''' | ||
| - | #Access the enclosure card from the Mercury Direct Plus main menu. | + | #Access the enclosure card from the [[Mercury Direct Plus Main Menu|Mercury Direct Plus main menu]]. |
#Add or edit text in the message text field.<br>'''Note:''' Logo, banner, and shop information may be present if these options have been configured in the Enclosure Card settings. | #Add or edit text in the message text field.<br>'''Note:''' Logo, banner, and shop information may be present if these options have been configured in the Enclosure Card settings. | ||
#Format the text using the following buttons: | #Format the text using the following buttons: | ||
| Line 31: | Line 31: | ||
#*Erase | #*Erase | ||
#*Background Color | #*Background Color | ||
| + | #*Bold Text | ||
| + | #*Italic Text | ||
| + | #*Underline Text | ||
#*Text Color | #*Text Color | ||
#*Font Style | #*Font Style | ||
Current revision
You can specify the message that is included with an order’s enclosure card. There are several options for the enclosure card, including whether a logo or banner is printed along with a message.
All settings for the enclosure card are configured via the Enclosure Card tab from the Mercury Direct Plus control panel.
To configure enclosure cards:
- From the Mercury Direct Plus control panel, click the Edit menu.
- Click Options.
- Click the Enclosure Card tab.
- Determine your printer and tray using the Printer and Tray dropdowns.
- To print a logo in your enclosure card, select the Logo button in the Logo/Banner section. Additionally:
- Check the Print Logo box in the Shop Logo section and navigate to the location of the logo using the Browse button.
- Set the orientation of the logo within the enclosure card (Top Right, Top Left, Bottom Right, or Bottom Left) using the Orientation buttons in the Shop Logo section.
- To print a banner in your enclosure card, select the Banner button in the Logo/Banner section. Additionally:
- Check the Print Banner box in the Shops Logo section and navigate to the location of the banner using the Browse button.
- Set the orientation of the banner within the enclosure card (Top or Bottom) using the Orientation buttons within the Shop Banner section.
- To print shop information, check the Print Shop Information box. Additionally:
- Supply shop information in the text box.
- Set the orientation of the shop information within the enclosure card (Top or Bottom) using the Orientation buttons within the Shop Information section.
- Click Apply to apply settings for all enclosure cards.
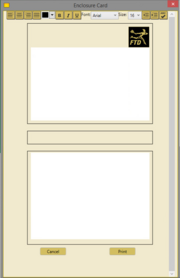
To modify and print an enclosure card:
- Access the enclosure card from the Mercury Direct Plus main menu.
- Add or edit text in the message text field.
Note: Logo, banner, and shop information may be present if these options have been configured in the Enclosure Card settings. - Format the text using the following buttons:
- Left Align
- Center Align
- Right Align
- Center Block
- Erase
- Background Color
- Bold Text
- Italic Text
- Underline Text
- Text Color
- Font Style
- Font Size
- Check your spelling using the Spell Check button.
- Click Print when all changes are complete.

