Event Planner: Locations Screen
From FloristWiki
(Difference between revisions)
| (5 intermediate revisions not shown.) | |||
| Line 1: | Line 1: | ||
| - | + | [[Image:EventPlanner_LocationsScreenSummary.jpg|thumb|Locations Screen (Summary)]] | |
| - | + | <table> | |
| + | <tr> | ||
| + | <td> | ||
| + | [[Image:X3FallOnlyIcon.png]] | ||
| + | </td> | ||
| + | <td> | ||
| + | This feature is available beginning in FTD Mercury X3 Fall. | ||
| + | </td> | ||
| + | </tr> | ||
| + | </table> | ||
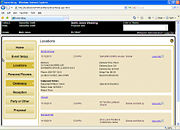
| + | The Locations screen is displayed when you add, edit, or view a location for an event. If you already have one or more locations entered for an event, you will see them in the Locations screen in a summary view, which can be expanded to quickly show even more details without displaying full information. | ||
| + | |||
| + | ==Location== | ||
| + | [[Image:EventPlanner_LocationsScreenEdit.jpg|thumb|Locations Screen]] | ||
<table style="width:775px; border: 1px black solid; border-collapse: collapse; border-spacing: 0px; text-align: left; "> | <table style="width:775px; border: 1px black solid; border-collapse: collapse; border-spacing: 0px; text-align: left; "> | ||
<tr style="background:#D1BC61;"> | <tr style="background:#D1BC61;"> | ||
| Line 26: | Line 39: | ||
<tr> | <tr> | ||
<td style="padding: 3px; vertical-align:top; text-align:left; font-size: 9pt; font-weight: bold;">Delivery Time</td> | <td style="padding: 3px; vertical-align:top; text-align:left; font-size: 9pt; font-weight: bold;">Delivery Time</td> | ||
| - | <td style="padding: 3px; text-align:left; font-size: 9pt;">Enter the delivery time for this location.</td> | + | <td style="padding: 3px; text-align:left; font-size: 9pt;">Enter the delivery time for this location. If you have delivery priority codes defined in FTD Mercury, you can begin typing and they will appear; however, you cannot use the code associated with the delivery priority code.</td> |
</tr> | </tr> | ||
<tr style="background:#f2ebd8;"> | <tr style="background:#f2ebd8;"> | ||
| Line 100: | Line 113: | ||
</table> | </table> | ||
| + | If equipment is going to be picked up, an invoice will be created for the equipment so you remember to retrieve it. This invoice will be created using the FTD Mercury default pickup zone, so this zone must be active in your system. | ||
<hr> | <hr> | ||
[[Event Planner|Back to Event Planner]] | [[Event Planner|Back to Event Planner]] | ||
Current revision
|
This feature is available beginning in FTD Mercury X3 Fall. |
The Locations screen is displayed when you add, edit, or view a location for an event. If you already have one or more locations entered for an event, you will see them in the Locations screen in a summary view, which can be expanded to quickly show even more details without displaying full information.
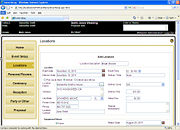
Location
| Field/Setting | Description |
| Location Description | Enter a description for the location. In most cases, you will want this to be a generic name such as Church or Reception Hall. This will be printed on proposals and used as the location name in the Locations screen, as well as in the Personal Flowers, Ceremony, Reception, and Party or Other screens. |
| Event Date | Enter the event date for this location. You can also click the calendar icon to pick the date. |
| Event Time | Enter the event time for this location. |
| Delivery Date | Enter the delivery date for this location. You can also click the calendar icon to pick the date. |
| Delivery Time | Enter the delivery time for this location. If you have delivery priority codes defined in FTD Mercury, you can begin typing and they will appear; however, you cannot use the code associated with the delivery priority code. |
| Delivery Method | Select whether items for this location will be picked up at your store, delivered, or delivered and set up. |
| Location Name | Enter the name of the location where the event is being held (for example, First St. Paul's Church). You can also perform an abbreviation code search by clicking the search button (...). |
| Address | Enter the street address for the location where the event is being held. |
| City/State | Enter the city and state or province for the location where the event is being held. |
| Postal Code | Enter the ZIP or postal code for the location where the event is being held. |
| Phone | Enter the phone number for the the location. |
| Location Contact | Enter the name of the person to contact at the location. |
| Delivery Zone | Select the delivery zone for this location. |
| Delivery Fee | Enter the delivery fee for this location. |
| Setup Fee | Enter the setup fee for this location. |
| Special Instructions | Enter any special instructions for this location. |
Equipment Return
If any equipment is being rented for this location, you can specify the return details in this area.
| Field/Setting | Description |
| Equipment Return | Select None if there is no equipment being returned. Select Equipment Pickup Required if you are going to pick up the rental equipment. Select Customer Return to Store if your customer is going to return the rental equipment to your shop. |
| Return Date | Enter in the date the equipment is to be returned or picked up. You can also click the calendar icon to pick the date. |
| Return Time | Enter the return time for the equipment. |
| Special Instructions | Enter any special instructions for equipment return. |
If equipment is going to be picked up, an invoice will be created for the equipment so you remember to retrieve it. This invoice will be created using the FTD Mercury default pickup zone, so this zone must be active in your system.


