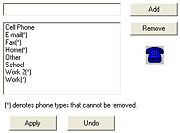
Mercury Administration: Phone Types Screen
From FloristWiki
Phone types are used when entering customer and employee information into FTD Mercury. They allow you to enter multiple phone numbers so you can, for example, save both a customer’s home and business phone numbers. By default, the following phone types are already set up in your system:
- Cell Phone
- Fax
- Home
- School
- Work
- Work2
- Other
|
You cannot remove a phone type if an employee or customer has a phone number stored in your system using that phone type. |
Accessing the Phone Types Screen
To access the Phone Types screen in Mercury Administration:
- Launch Mercury Administration.
- Double-click Mercury Administration in the explorer pane.
- Double-click the System folder.
- Double-click Phone Types. The Phone Types screen opens.
Adding Phone Types
To add a new phone type:
- In Mercury Administration, access the Phone Types screen.
- In the text box, enter the name for the new phone type.
- Click Add.
- Click Apply to save your changes before exiting this screen.
Removing Existing Phone Types
|
You cannot remove a phone type if an employee or customer has a phone number stored in your system using that phone type. |
To remove an existing phone type:
- In Mercury Administration, access the Phone Types screen.
- From the list of existing phone types, select the phone type you want to remove. You cannot remove phone types that are denoted with an asterisk (*).
- Click Remove.
- Click Apply to save your changes before exiting this screen.

