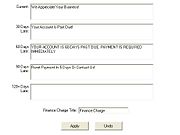
Mercury Administration: Dunning Message Screen
From FloristWiki
Dunning messages are reminders of payment that appear on a customer’s statement. You may set up your own default messages for current customer statements or statements for customers that are 30, 60, 90, or 120+ days past due. When these dunning messages are set up, they appear on all customer statements. If you would not like dunning messages to appear on a specific customer statement, you may clear the Print Dunning Message option in the House Account tab of the Customer Detail Information window for that customer.
You can configure the following settings on this screen:
| Setting | Description |
| Current | Enter the dunning message you want to use if the customer account is current. |
| 30 Days Late | Enter the dunning message you want to use if the customer account is 30 days late. |
| 60 Days Late | Enter the dunning message you want to use if the customer account is 60 days late. |
| 90 Days Late | Enter the dunning message you want to use if the customer account is 90 days late. |
| 120+ Days Late | Enter the dunning message you want to use if the account is 120 days or more late. |
| Finance Charge Title | Enter the name of the line item you want to use on statements for the finance charge. For example, instead of calling it a Finance Charge, you may want to call it a Rebilling Fee. |
Accessing the Dunning Message Screen
To access the Dunning Messages screen in Mercury Administration:
- Launch Mercury Administration.
- Double-click Mercury Administration in the explorer pane.
- Double-click the Accounting folder.
- Double-click Dunning Messages. The Dunning Messages screen opens.
Configuring Dunning Messages
To configure dunning messages:
- In Mercury Administration, access the Dunning Messages screen.
- Type the dunning messages you want to include on each statement type in the appropriate text boxes.
- In the Finance Charge Title field, enter how you want the finance charge to be itemized on statements.
- Click Apply to save your changes.

