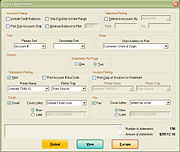
Output Statements Window
From FloristWiki
|
This information applies to FTD Mercury X2 Fall and later versions.
The Output Statements window is used when you are generating statements. You can select several options that affect which statements are generated during your statement run.
Account Criteria
This area contains four options that enable you to restrict the accounts for which statements are generated.
| Option | Description |
| Include Credit Balances | Select this option to include credit balances in the statement batch. |
| Only if Activity Since Last Statement | If you only want to generate statements for accounts that have had activity since the last time you generated statements, select this option. |
| Past Due Accounts Only | If you only want to generate statements for past due accounts, select this option. |
| Minimum Balance to Print | If you want to restrict statements to those with a specific minimum balance, select this option and specify the minimum. |
Selective Printing
By selecting the Selective Accounts By check box, you can restrict the printing of statements based on a range of account numbers, account names, or ZIP/postal codes. After you have selected the basis for the restriction, you can then enter a range in the From and To fields. When no text is entered in the From field, FTD Mercury includes all accounts up to the To value in the statement batch. Likewise, if you do not enter text in the To field, all records from the From value are included in the batch.
Sort
In the Primary Sort field, select the primary sort criteria for the statements. If desired, enter a secondary sort criteria.
Store
From this list, select the store address to print when outputting statements. If you are a single-store environment, your store name will already be selected. If you are a multi-store environment, you can select a specific store or use Customer's Store of Origin to print the name of the store of origin for the customer.
Output
Statements Per Page
Choose whether you wish your statements to be printed One per page (on 8.5" by 11" paper) or Two per page (on 8.5" by 14" paper).
Statements Printing
Select whether you want to print statements. You also have the option of whether you want to print a bar code of the account number on the statements (which is handy if you are using a bar code scanner when receiving payments on the house accounts). Once you select to print statements, you need to specify the printer name and printer tray for your statements.
Invoice Printing
Select the Print Copy of Invoices for Statement to print copies of invoices included on the statement once the statement is printed. You then need to select the printer name and tray where you want the invoices to print. If you select this option, the statement includes the text “Invoices Enclosed” when you print.
When you are outputting statements from the Statement tab of the Customer Detail Information window, this option is only available if the account has been configured to print invoices from the House Account tab. If you are outputting statements from a statement search, as long as at least one of the accounts is configured to print invoices, this option is available. However, only accounts configured to print invoices will output the invoices if you select this option. The same is true when generating statements from the Generate Statement window.
Select whether you want to email statements. If you do want to email statements, select if you would like to email the statements now (after statements are generated) or later. If you select Later, specify the date and time when you want to send the email messages. You can also select the Cover Letter for the email messages from the Cover Letter list.
Fax
Select whether you want to fax statements. If you do, select if you would like to fax the statements now (after statements are generated) or later. If you select Later, specify the date and time when you want to send the faxes. You can also select the Cover Letter for the email messages from the Cover Letter list.
Totals
At the bottom right of this window, the number of statements that will be generated based on your selections is displayed, as well as the total amount on those statements.
Buttons
At the bottom of the window, there are three buttons. Click Output to begin outputting statements. Click View to open the View Statements window to display the statements generated prior to output. Click Escape to close the window without outputting statements.

