Mercury Direct Plus Control Panel
From FloristWiki
From the Mercury Direct Plus Control Panel, you can configure Mercury Direct Plus. Every few minutes, Mercury Direct Plus connects with the Internet to send and receive orders and messages.
The Control Panel is set up to start automatically each time your computer starts up. You must have the Control Panel running in order to access the Mercury Direct Client and send orders; therefore, it is suggested to always keep the Control Panel running while your computer is on.
NOTE: Because the Control Panel is the program that sends and receives orders and messages, you do not have to run the Mercury Direct Client to receive orders.
To access the Control Panel (if the Control Panel is already running), double click the Mercury Direct Plus icon in the lower right hand corner of the desktop.
If the Control Panel is not running (you have manually exited the Control Panel and you want to start it up again), start the Control Panel by clicking the Start button on your computer’s desktop, then highlighting Programs, FTDI, Mercury Direct Plus then clicking Mercury Direct Plus Control Panel.
NOTE: When you minimize the Control Panel (when you click the button to move the Control Panel to the task bar at the bottom of your screen), you must double click the Mercury Direct Plus icon in the lower right hand corner of the desktop to bring it up on the desktop again. Note that when you minimize the Control Panel, you are not closing it - the Control Panel is still running.
The buttons along the right hand side of the screen give you easy access to commonly-used functions:
- The Print button prints the highlighted message.
- The View button displays the message detail of the highlighted message.
- The Refresh button refreshes the message log.
- The Connect/Disconnect button connects you with the Mercury Direct Host. Clicking this button will check for new orders or messages.
The bottom half of the control panel displays the Communications Log. This log will display any communications activity, such as when the Control Panel is checking for messages, or if there are any connection errors
Changing the Communication Method (The Account Tab)
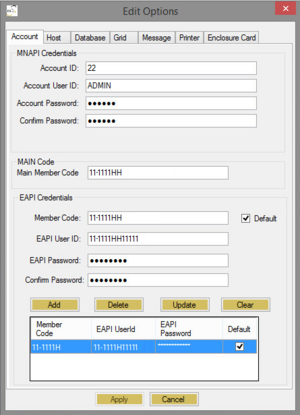
The Account tab determines the communication method for processing messages. Mercury Direct Plus uses the EROS Application Program Interface (EAPI) to process messages.
Account information is stored in the MNAPI Credentials section. In this section, your account ID, account user ID, and account password are listed. These values are automatically populated from your system.
The Main Member Code box in the MAIN Code section can be blank. If this box is populated, the value must be an EAPI Member Code that has been configured in the EAPI Credentials section.
Multiple EAPI accounts can be present in the EAPI Credentials section. EAPI account information is automatically populated from your system. If not already populated, the following information must be supplied for each EAPI account:
- Main code
- Member code
- EAPI user ID
- EAPI password
If any fields in the EAPI Credentials section are blank, an error message appears.
|
Once Mercury Direct Plus is configured to use EAPI, it cannot communicate with EROS via MNAPI without configuration changes. To re-enable MNAPI, contact the Mercury Technology Assistance Center (MTAC) by calling 888-309-2244. |
Please do not change any other fields in this window, unless you are instructed to do so by Mercury Direct Support.
Changing the Connection Frequency and Blackout Period (The Host Tab)
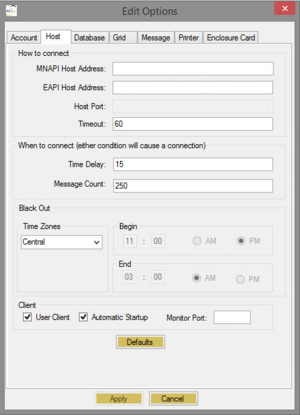
To access the Host tab, from the Control Panel, click the Edit menu then click Options and select the Host tab. You can supply both the MNAPI and EAPI Host Addresses via this tab.
By default, the Control Panel connects with the Internet and sends and receives waiting orders and messages every 15 minutes. You can change the frequency that the Control Panel connects to the Internet in the Host tab of the Edit Options window.
To change how often the Control Panel connects, change the number of minutes in the Polling Interval field (for example, the number 15 in the Polling Interval field means that the Control Panel will connect to the Internet and send and receive any waiting messages every 15 minutes) or type a lower number in the Message Count field. When you are finished, click the Apply button.
To change the blackout period, type new Begin and End times in the Black Out section of the screen and select the appropriate time zone. The Black Out period is a span of time where Mercury Direct will NOT try to connect to send or receive orders.
Please do not change any other fields in this window, unless you are instructed to do so by Mercury Direct Support.
Changing the Database Settings (The Database Tab)
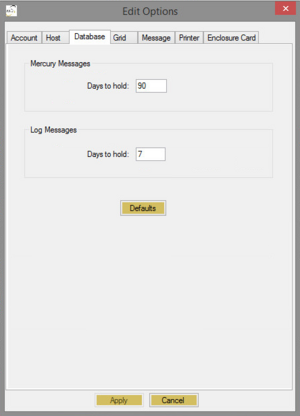
The Database tab determines how long Mercury and log messages are maintained in the database.
You can specify the length of time (in days) that Mercury messages and log messages are maintained by modifying the value in the appropriate Days to hold field.
Customizing the Message List (The Grid Tab)
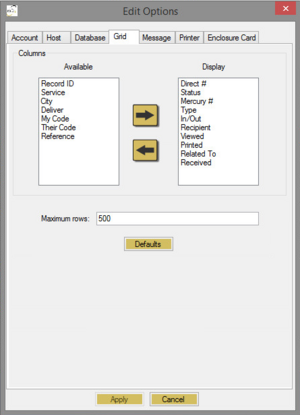
The heading at the top of the Control Panel Message List tells you what type of information is displayed for each message. By default, the fields on the Message List heading are: Status, Mercury #, Type, In/Out, Recipient, Received, Related to, Viewed, and Printed. If you would like to change the information that is displayed for each message in the Message List, you can customize this heading in the Control Panel in the Grid tab.
To access the Grid tab, from the Control Panel click the Edit menu, then click Options. Then click the Grid tab.
To remove a field from the Message List, highlight the field in the Display box and then click the left arrow to move it to the Available box. To add a field to the Message list, highlight the field that you would like to add in the Available box, then click the right arrow to move it to the Display box.
When you are finished making changes, click the Apply button.
Printer Routing (The Message Tab)
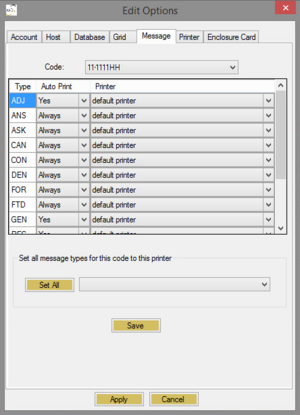
The Message tab allows you to select a default printer, and set up your printer routing. Here you can specify if you would like to print certain message types when they are sent or received, and if so, where you would like them to print.
To access the Message tab, from the Control Panel click the Edit menu, then click Options. Then click the Message tab.
For each message type listed in the Type column, the program displays in the Auto Print column whether the message will print to your printer when it is sent or received. The Printer column displays which printer the order or message type will print to. If the order or message type is set to print to your default printer, this means that it will print to the printer that you have set as the default printer in Windows. By default, all orders and messages are set to print to your default printer.
If a message type displays Always in the Auto Print column, then you cannot change the Auto Print setting (but you can change the Printer setting).
To change a message type Auto Print setting to No, click inside the Auto Print column for that message type so that a down arrow appears. Then click the down arrow and select No.
To change the printer that the message type prints to, click in the Printer column for that message type so that a down arrow appears. Then click the down arrow and select a new printer from the list.
You can quickly change the printer for all message types by using the field located at the bottom of the screen. In the field that reads “Set all message types for this code to this printer,” you can select a printer from the drop down list and then click Set all to change all printers. When all of your changes in this window are complete, click the Save button at the bottom of the window.
Printer Settings (The Printer Tab)
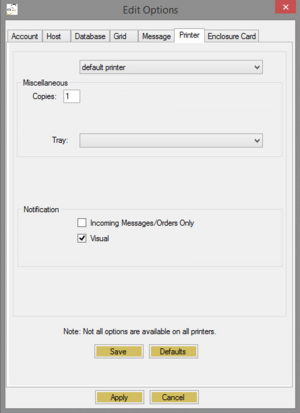
The Printer tab allows you to change settings for an individual printer. To access the Printer tab, from the Control Panel click the Edit menu, then click Options. Then click the Printer tab.
First select a printer from the Printer field, then change any settings for the printer.
The following is a list of field descriptions for this window:
- Printer - this field displays a list of your printers. Select a printer from the list to change the settings for that printer.
- Copies - the number of copies that you would like this printer to print.
- Paper - select from this field the size of paper that is loaded in the printer.
- Orientation - select if you would print Portrait (vertical) or Landscape (horizontal).
- Notification - when a message is printed, a message pops up. This section of the screen allows you to configure when and how this pop up is displayed. You can select any combination of the following:
- Incoming Messages/Orders Only - when checked, this causes a pop up message to display only when incoming messages are printed.
- Visual - when checked, this causes a message to pop up when any message has been printed.
- Audible - when checked, this generates an audible “beep” noise when any message has been printed.
When you are finished making changes, click the Apply button at the bottom of the window.
Enclosure Card Settings (The Enclosure Card Tab)
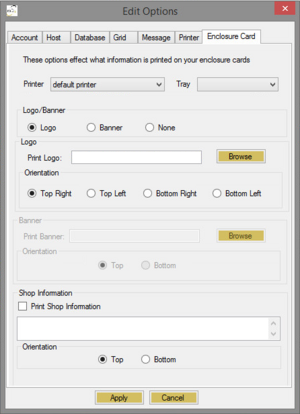
The Enclosure Card tab allows you to change Enclosure Card settings.
To access the Enclosure Card tab, from the Control Panel click the Edit menu, then click Options. Then click the Enclosure Card tab.
The options available via the Enclosure Card tab determine the information that is printed on the enclosure card.
You can choose which printer and tray prints the enclosure card.
Additionally, you can specify if a logo or banner should be printed in the message text field by selecting the logo and banner buttons.
If you are printing a logo or banner, ensure that the Print Logo and/or Print Banner buttons are selected under the Shop Logo or Shop Banner sections.
You can browse for the shop logo or shop banner using the Browse buttons and determine the location of the logo or banner on the enclosure card using the accompanying Orientation buttons.
To print shop information on the enclosure card, check the Print Shop Information box and enter any shop information in the text box. You can determine the location of the shop information text on the enclosure card using the accompanying Orientation buttons.
