SMS and Email Entry
From FloristWiki
| Line 6: | Line 6: | ||
<td style="padding: 3px; text-align:left; font-size: 10pt; font-weight: bold; width: 150px;">Field</td> | <td style="padding: 3px; text-align:left; font-size: 10pt; font-weight: bold; width: 150px;">Field</td> | ||
<td style="padding: 3px; text-align left; font-size: 10pt; font-weight: bold;">Description</td> | <td style="padding: 3px; text-align left; font-size: 10pt; font-weight: bold;">Description</td> | ||
| - | |||
| - | |||
| - | |||
| - | |||
| - | |||
| - | |||
| - | |||
| - | |||
</tr> | </tr> | ||
<tr> | <tr> | ||
| Line 24: | Line 16: | ||
</tr> | </tr> | ||
</table><br> | </table><br> | ||
| - | To send a receipt via SMS, | + | To send a receipt via SMS (text), toggle the slider to the right next to the phone icon and supply the card holder’s 11-digit phone number in the text box. The designated recipient will receive a text in the following format: |
| - | ::<tt>Thank you for your purchase at ''Store Name'' in the amount of ''$Amount''.</tt> | + | ::<tt><big>Thank you for your purchase at ''Store Name'' in the amount of ''$Amount''.</big></tt> |
| - | To send a receipt via email, | + | To send a receipt via email, toggle the slider to the right next to the message icon and supply the card holder’s email address. The designated recipient will receive an email in the following format: |
| - | + | <tt><big> | |
| + | ::Thank you for your purchase at ''Store Name''. | ||
::Here is your receipt of your purchase of ''$Amount''. | ::Here is your receipt of your purchase of ''$Amount''. | ||
::''Card Holder's Signature Image'' | ::''Card Holder's Signature Image'' | ||
::We look forward to doing more business with you in the future! | ::We look forward to doing more business with you in the future! | ||
| - | ::''Store Name''</tt> | + | ::''Store Name''</big></tt> |
| - | + | {| | |
| - | + | |- | |
| + | |[[Image:NoteIcon.png]] | ||
| + | | | ||
| + | You cannot send both a text and email receipt for a transaction. Enabling one type of receipt automatically disables the other type of receipt. | ||
| + | |} | ||
To complete the transaction without sending a receipt, tap the Skip button. To send the receipt and complete the transaction, tap the Send button. A new [[Quick Sale Entry]] screen displays. | To complete the transaction without sending a receipt, tap the Skip button. To send the receipt and complete the transaction, tap the Send button. A new [[Quick Sale Entry]] screen displays. | ||
Revision as of 10:37, 24 June 2014
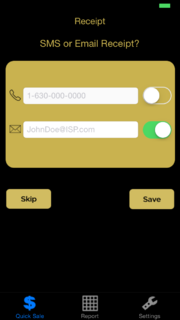
From the SMS and Email Entry screen you can send a receipt of the completed transaction via either SMS (text) or email.
| Field | Description |
| Phone Icon | The customer’s phone number. |
| Message Icon | The customer’s email address. You can enter as many email addresses as your mobile device supports. |
To send a receipt via SMS (text), toggle the slider to the right next to the phone icon and supply the card holder’s 11-digit phone number in the text box. The designated recipient will receive a text in the following format:
- Thank you for your purchase at Store Name in the amount of $Amount.
To send a receipt via email, toggle the slider to the right next to the message icon and supply the card holder’s email address. The designated recipient will receive an email in the following format:
- Thank you for your purchase at Store Name.
- Here is your receipt of your purchase of $Amount.
- Card Holder's Signature Image
- We look forward to doing more business with you in the future!
- Store Name
|
You cannot send both a text and email receipt for a transaction. Enabling one type of receipt automatically disables the other type of receipt. |
To complete the transaction without sending a receipt, tap the Skip button. To send the receipt and complete the transaction, tap the Send button. A new Quick Sale Entry screen displays.

