Retail ToGo Entry
From FloristWiki
m |
|||
| (9 intermediate revisions not shown.) | |||
| Line 1: | Line 1: | ||
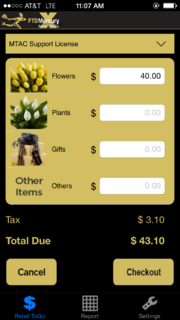
| - | [[Image: | + | [[Image: RTG_Home.PNG|thumb|Retail ToGo mobile app (X5 Fall) Retail ToGo Entry screen]] |
| - | From the | + | From the Retail ToGo Entry screen, you can add transaction information and receive the transaction total, including tax.<br> |
<br> | <br> | ||
<table style="width:625px; border: 1px black solid; border-collapse: collapse; border-spacing: 0px; text-align: left; "> | <table style="width:625px; border: 1px black solid; border-collapse: collapse; border-spacing: 0px; text-align: left; "> | ||
| Line 33: | Line 33: | ||
</table> | </table> | ||
<br> | <br> | ||
| - | To begin | + | To begin Retail ToGo , tap the Store List at the top of the screen to select your store. Once you’ve selected your store, select the appropriate image category for the first item in your transaction. Selecting the image category will bring you to the [[Product Code and Quantity Entry]] screen, where you will enter the transaction details for each item. Repeat this process for each unique item in your transaction. |
| - | Alternately, you can enter the category totals on the | + | Alternately, you can enter the category totals on the Retail ToGo Entry screen without progressing to the [[Product Code and Quantity Entry]] screen. If you enter category totals, you cannot add additional details that are available on the [[Product Code and Quantity Entry]] screen. |
{| | {| | ||
|- | |- | ||
| Line 43: | Line 43: | ||
|} | |} | ||
| - | Your total, including tax, updates on the | + | Your total, including tax, updates on the Retail ToGo Entry screen after each item you enter. |
| - | After entering your items, you can either tap Clear to remove all items and return to a new | + | After entering your items, you can either tap Clear to remove all items and return to a new Retail ToGo Entry screen or tap Save to proceed with the transaction and continue to the [[Payment Tender]] screen. |
{| | {| | ||
|- | |- | ||
|[[Image:NoteIcon.png]] | |[[Image:NoteIcon.png]] | ||
| | | | ||
| - | After tapping Clear, you will be asked "Do you want to clear product list?" Tap Yes to clear all information or No to return to the | + | After tapping Clear, you will be asked "Do you want to clear product list?" Tap Yes to clear all information or No to return to the Retail ToGo Entry screen with the transaction details you have entered. |
|} | |} | ||
<hr> | <hr> | ||
| - | [[FTD Mercury | + | [[FTD Mercury Retail ToGo Mobile App|Back to FTD Mercury Retail ToGo mobile app documentation]] |
Current revision
From the Retail ToGo Entry screen, you can add transaction information and receive the transaction total, including tax.
| Field | Description |
| Store List | List of available stores you’ve configured in FTD Mercury. |
| Flower, Plants, Gifts, and Other Items Icons | Link to Product Code and Quantity Entry for item type. |
| Flowers | Price of all flower items in transaction. |
| Plants | Price of all plant items in transaction. |
| Gifts | Price of all gift items in transaction. |
| Others | Price of all other items in transaction. |
To begin Retail ToGo , tap the Store List at the top of the screen to select your store. Once you’ve selected your store, select the appropriate image category for the first item in your transaction. Selecting the image category will bring you to the Product Code and Quantity Entry screen, where you will enter the transaction details for each item. Repeat this process for each unique item in your transaction.
Alternately, you can enter the category totals on the Retail ToGo Entry screen without progressing to the Product Code and Quantity Entry screen. If you enter category totals, you cannot add additional details that are available on the Product Code and Quantity Entry screen.
Your total, including tax, updates on the Retail ToGo Entry screen after each item you enter.
After entering your items, you can either tap Clear to remove all items and return to a new Retail ToGo Entry screen or tap Save to proceed with the transaction and continue to the Payment Tender screen.

