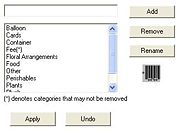
Mercury Administration: Product Category Screen
From FloristWiki
Product categories are used as a tool to help you track what types of items are being sold in your store. They “categorize” your products (for example, “Cards,” “Containers,” “Perishables,” etc.) so that you can evaluate what types of products are being sold and how. For example, many reports are sorted by product category, such as the Product Comparison Report, Product Sales Report, Business Snapshot Report, and Employee Analysis Report.
Product Categories are also important if you use the Mercury Accounting. When you export data from FTD Mercury to QuickBooks, product sales are exported to QuickBooks by product category. For example, all sales from your products with the “Perishables” product category are exported to the “Perishables” income account in QuickBooks.
By default all of the FTD Selection Guide products are assigned the product category Other. You may want to assign these products different product categories, or create one or more product categories to assign to the Selection Guide products. Note that each time you update the directory, you are adding new Selection Guide products. Therefore you may want to make a habit of updating the product categories of these products are soon as they are added to your database.
The following product categories have already been set up in FTD Mercury:
- Cards
- Container
- Fee
- Perishables
- Plush
- Other
To learn how to assign a product category to a product, see Adding New Products.
|
You cannot Remove or Rename a product category if a GL account has been created for that product category in the Chart of Accounts Wizard. |
Accessing the Product Category Screen
To access the Product Category screen in Mercury Administration:
- Launch Mercury Administration.
- Double-click Mercury Administration in the explorer pane.
- Double-click the System folder.
- Double-click Product Category. The Product Category screen opens.
Adding Product Categories
To add a product category:
- In Mercury Administration, access the Product Category screen.
- In the text box, enter the name for the new category.
- Click Add.
- Click Apply to save your changes before exiting this screen.
Removing Product Categories
To remove an existing product category:
- In Mercury Administration, access the Product Category screen.
- Select the category you want to remove from the list of existing product categories. Product categories that cannot be removed from your system are followed by (*).
- Click Remove.
- Click Apply to save your changes before exiting this screen.

