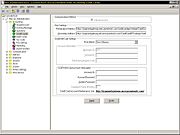
Mercury Administration: Credit Cards Screen
From FloristWiki
The Credit Cards screen (formerly the Settlement screen) in Mercury Administration allows you to configure your credit card and gift card processing settings if you are a member of the FTD Cash-Flo program.
The Credit Cards screen contains the following settings:
| Setting | Description |
| Communication Method | This is always set to Internet Access. |
| Primary Host Address | This is the address used for processing credit cards and gift cards over the Internet. You should not change this value except when directed to by the Mercury Technology Assistance Center. |
| Secondary Address | This is a backup address to use if there is a communication interruption with the Primary Host Address. You should not change this value except when directed to by the Mercury Technology Assistance Center. |
| Store Name | Select the store for which you are configuring credit card or gift card processing information. You must configure settings for each store separately, although once you make the settings for one store and then select a different store, settings from the first store are retained until you click the Undo button. |
| Merchant ID | Enter your Merchant ID number in this field. This is a number provided by FTD Cash-Flo personnel. If you do not have a Merchant ID, contact Member Services at 1-800-788-9000 to obtain one. |
| Terminal ID | Enter the Terminal ID given to you by Global Payments (NDC). |
| Merchant Category Code | Enter the Merchant Category Code given to you by Global Payments (NDC). |
| Account ID | Enter your account ID as provided to you by FTD for processing credit cards and gift cards over the Internet. |
| Account Password | Enter the account password provided to you by FTD. Your password will be masked during entry for security. |
| Confirm Password | Reenter your password, which will be masked for security. |
| Expiration Period (Months) | Enter the number of months that new or reloaded gift cards will be valid. The default number of months, 0, means that gift cards do not expire. |
| Allow approved transactions with CVV Mismatch to process. | Allows credit card transactions with CVV mismatches to be approved. By default, this is not checked, indicating that CVV mismatches are not allowed. |
Once you have made changes to credit card processing information, click Apply before exiting this screen. If you change the Communication Method or Host Setting, you are required to perform an FTDShutdown and then an FTDStartup to apply these changes.
Accessing the Credit Cards Screen
To access the Credit Cards screen in Mercury Administration:
- Launch Mercury Administration.
- Double-click Mercury Administration in the explorer pane.
- Double-click the Accounting folder.
- Double-click Credit Cards. The Credit Cards screen opens.
Maintaining Your Credit Cards over the Internet Account
When you sign up for processing credit cards over the Internet, FTD will provide you a user ID and password. You can then use the maintenance link in the Credit Cards screen in Mercury Administration to maintain your account. You will be required to update your account password when you first log into the account; you will use your user ID and password in Mercury Administration to configure credit card processing.
The maintenance link launches your Web browser, displays the credit card maintenance login, and allows you to log in to change your password or request a callback from FTD regarding credit card processing.
Setting the Gift Card Expiration Period
By default, FTD Mercury does not set an expiration date for the gift cards that you sell. If you want gift cards to be valid for a specific number of months, you must enter the number of months in the Expiration Period (Months) field in the Credit Cards screen. Expired gift cards cannot be used for payment and expired gift cards cannot be reloaded.
To set the gift card expiration period:
- In Mercury Administration, access the Credit Cards screen.
- If you have multiple stores, click the arrow and select your store name from the Store Name list.
- In the Expiration Period (Months) field, enter the number of months that gift cards will be valid.
- Click Apply to save the information before exiting this screen.

