Confirmation Message
From FloristWiki
|
The CONfirmation message allows you to confirm a cancellation request. For example, you may receive a CANcellation message requesting that an order not be filled. CONfirmation messages are optional. You do not have to send back a CONfirmation message if you receive a CANcellation message and are able to cancel the order.
However if you cannot cancel the order in time, you must send a DENy message to deny the cancellation (see DENy Message on page 4–29).
Sending a Confirmation Message
To send a CONfirmation message:
- On the FTD Mercury Main Menu, in the Search area, click Message. You can also click Message Center from a blank Order Entry or Point of Sale window. The Message Center opens.
- Perform a search to locate the message to which you want to respond.
- Select the message from the results list and click Respond.
- From the menu, click Confirm. The Create CON Message window appears with most of the information completed for you.
- Change any information or add notes as needed.
- Click Send.
The system prints a verified copy of the message on your Mercury printer once the message has been received by the Host Computer (unless you have specified otherwise in Mercury Administration). The verified copy includes the Mercury number.
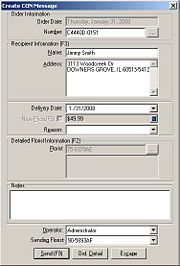
Create CON Message Window
The Create CON Message window allows you to confirm a cancellation request. The window is organized into the following areas:
Order Information
| Setting | Description |
| Order Date | Displays the date of the original order. |
| Number | Displays the Mercury number of the original order. You can also click the Search button (…) to search for the Mercury # in Message Center. When you find the message in Message Center and double-click it in the results list, this field will automatically populate with the selected message’s Mercury #. |
Recipient Information
In this area, enter the recipient’s name and address in the appropriate fields.
Message Information
| Setting | Description |
| Delivery Date | Enter the delivery date. You can also click the arrow to display a calendar, from which you can select the delivery date. |
| New Price | If you are requesting a new price for the order, select this option and enter the new price in the text box. |
| Reason | Select the reason you are sending this message. |
Detailed Florist Information
This area contains information about the sending florist, including their shop code and contact information.
Notes
Enter any additional information for this message in this area.
Operator Information
| Setting | Description |
| Operator | Select the name of the employee sending this message. |
| Sending Florist | By default, your store name appears selected in this list. If you have multiple stores, select the name of the store sending this message. |
Click the Ord. Detail button to open the Order Detail View window.

